This feature is available as an add-on for Growth and Enterprise plans. Please contact your Userpilot account manager to have it enabled.
Before you begin, make sure you’ve reviewed the Prerequisites to ensure your account and cloud storage are ready for Data Sync.
Accessing Data Sync
To access the Data Sync feature:- Log in to your Userpilot account.
- In the left-hand navigation menu, click on Data.
- Under the Data section, click on Data Sync.
The Data Sync Dashboard
The Data Sync dashboard provides an overview of all your configured export jobs. From here, you can see key information at a glance and manage your existing jobs or create new ones.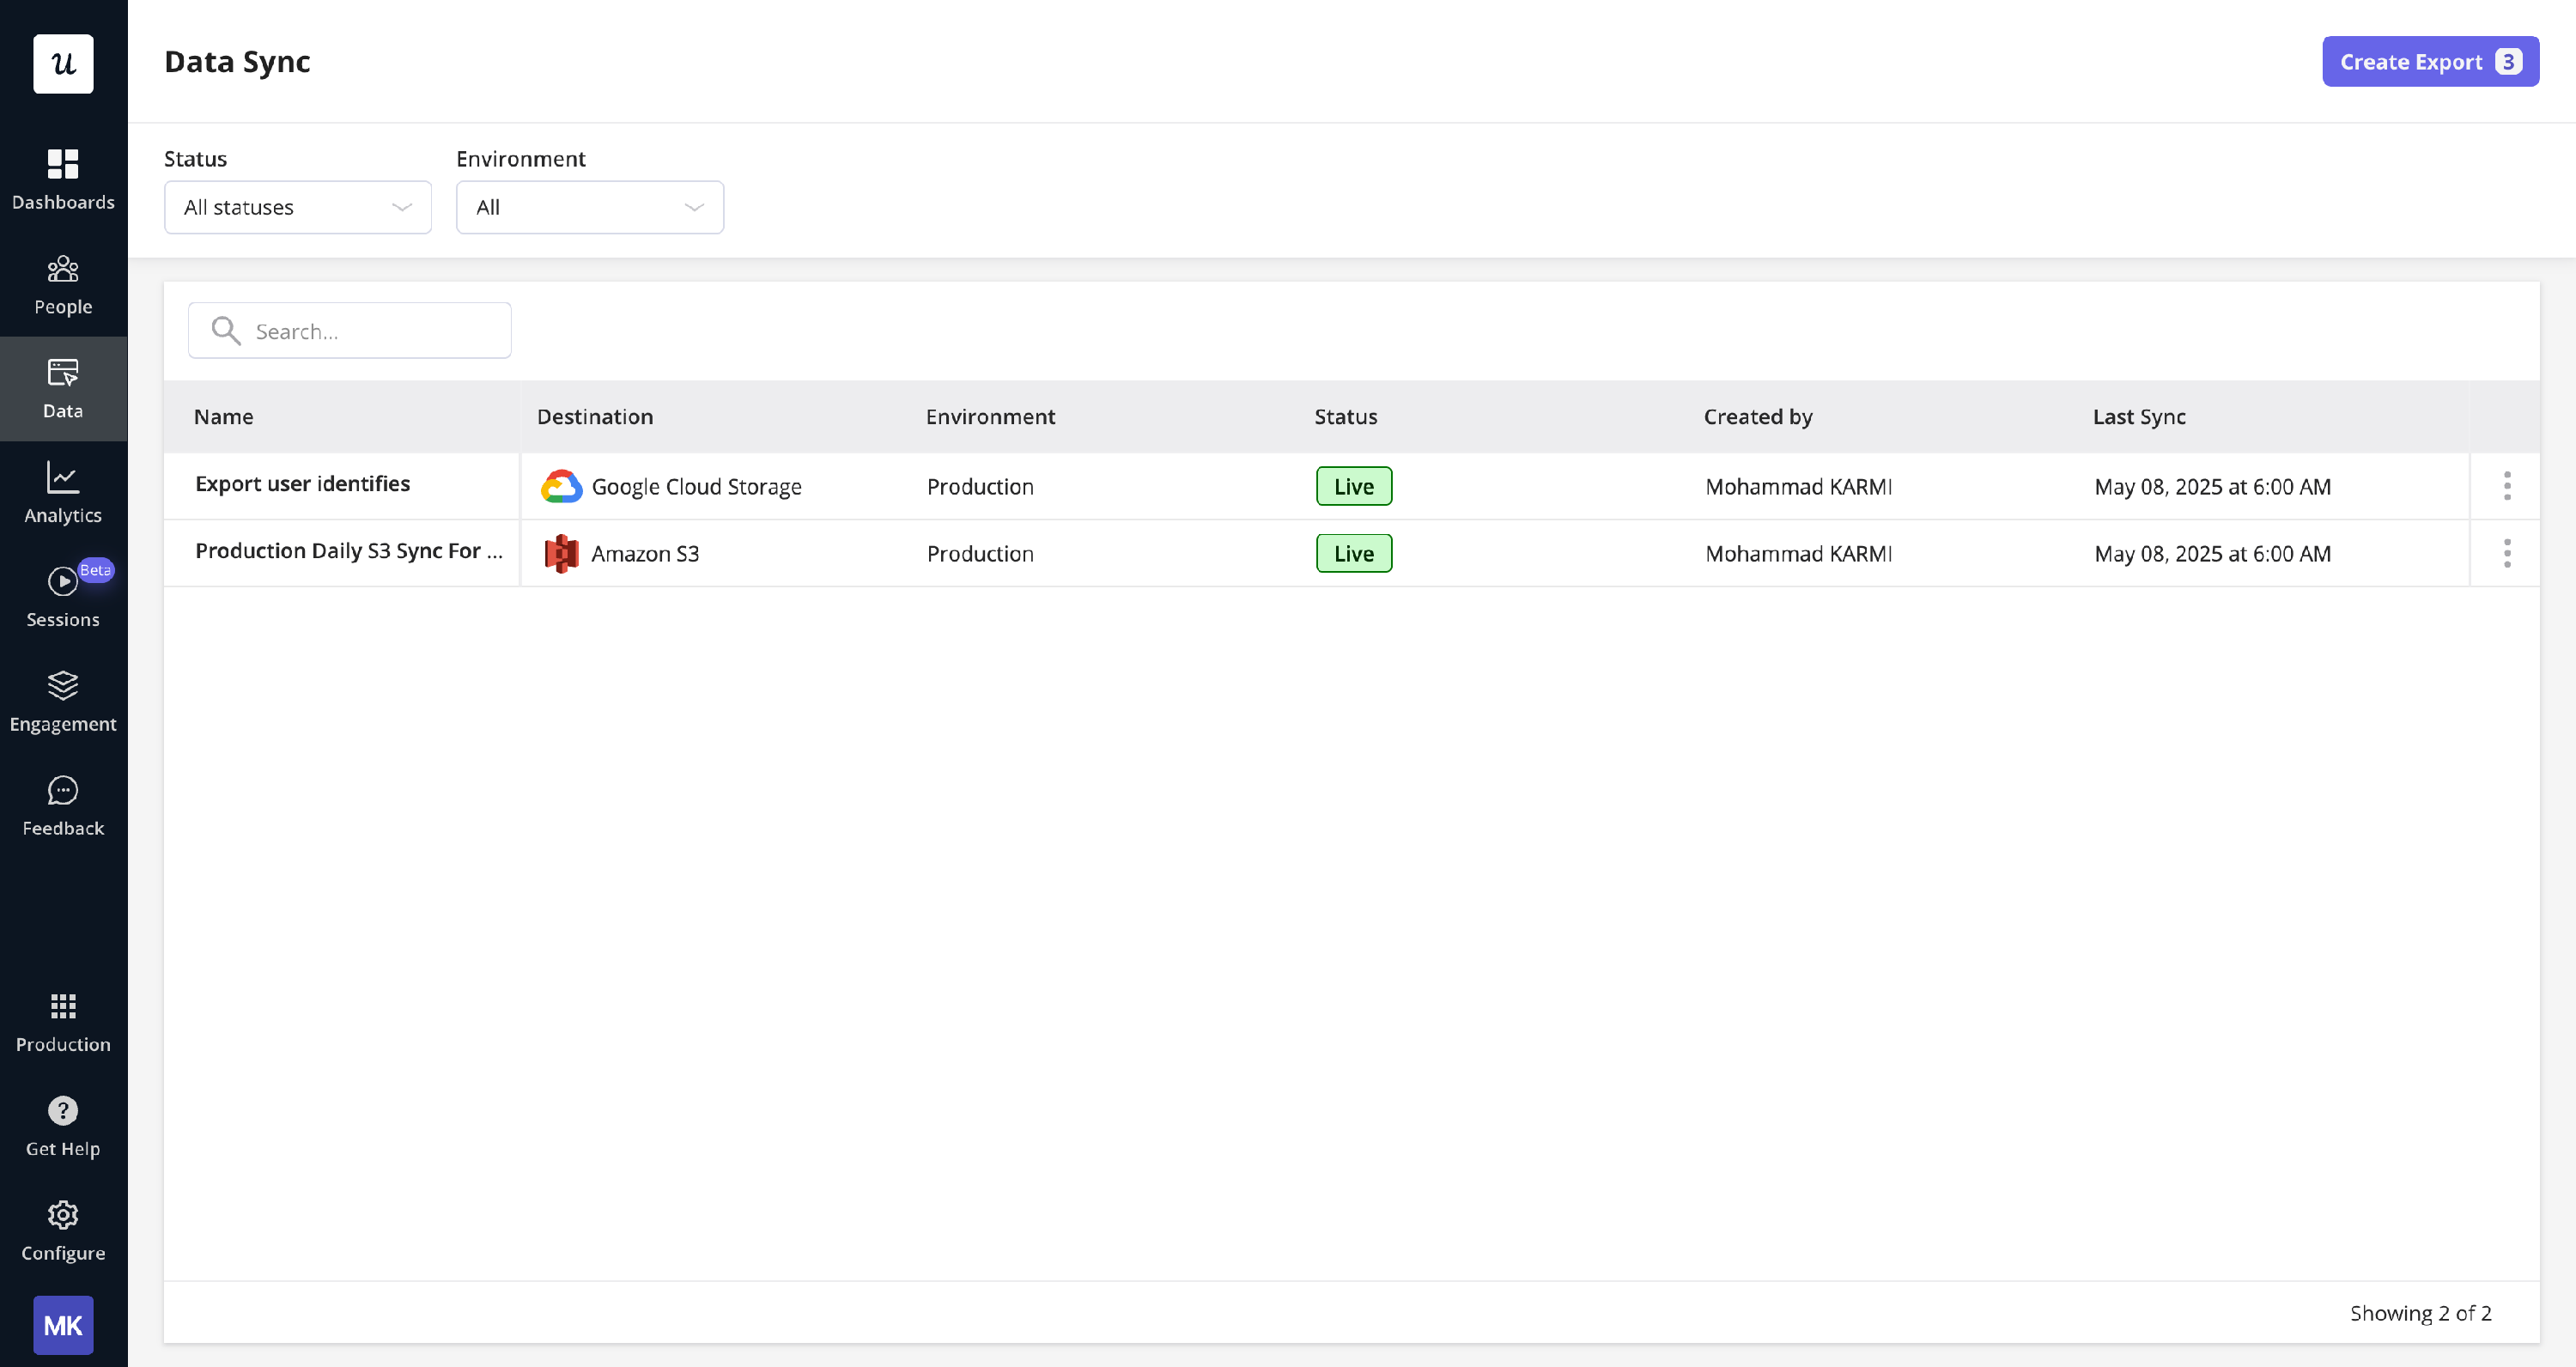
- Name: The custom name you assigned to the export job.
- Destination: The cloud storage provider and bucket where the data is being sent (e.g., Amazon S3, Google Cloud Storage).
- Status: The current status of the export job (e.g., Live, Disabled, Ended).
- Created by: The Userpilot user who created the export job.
- Last Sync: The date and time of the most recent successful data export for that job.
- By Status: Click the “Status” dropdown (defaulting to “All statuses”) to filter by:
- All statuses
- Live
- Disabled
- Ended
- By Environment: Click the “Environment” dropdown (defaulting to “All Environments”) to filter by:
- Production
- Staging
Creating a New Export Job
Setting up a new export job involves a straightforward wizard that guides you through the necessary configuration steps. Once you click the “Create Export” button on the Data Sync dashboard, the creation process begins. The wizard typically involves the following main stages, which we will detail using Google Cloud Storage as an example:- Select Export Destination & Review Data Structure
- Setup Connection
- Verify Connection
- Setup Export Configuration
- Review Export Configuration
Step 1: Select Export Destination & Review Data Structure
In the first step of creating an export, you will choose where you want your data to be sent and get an overview of the data structure.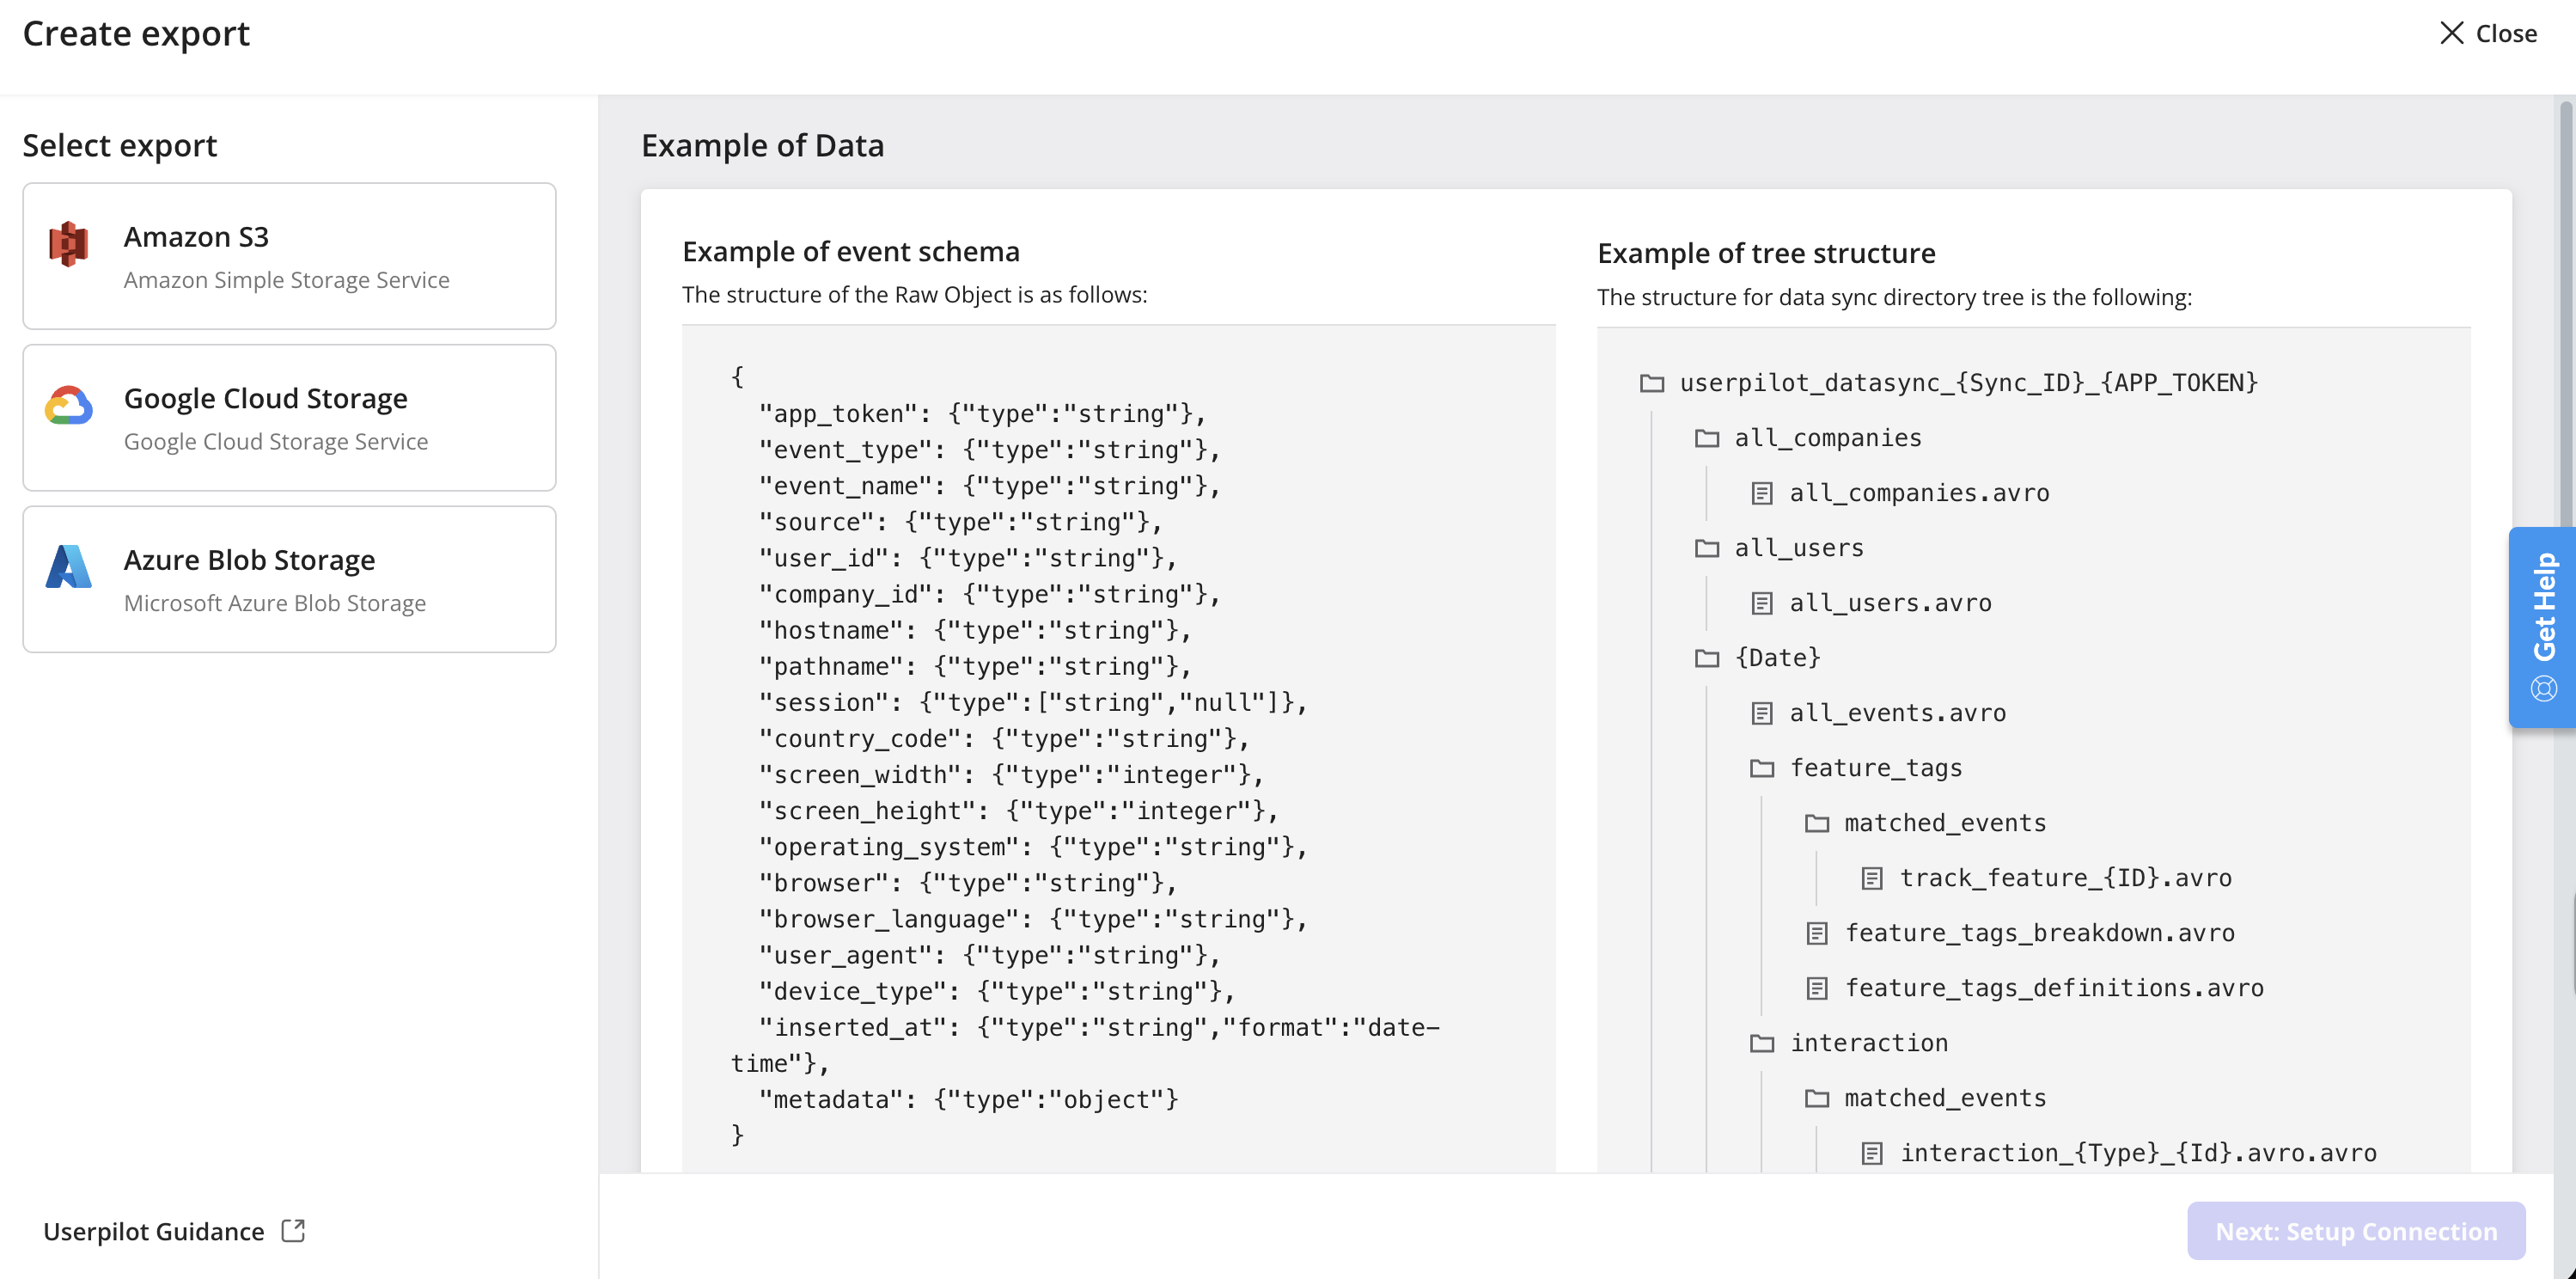
- Choose your cloud storage provider:
- Amazon S3: Amazon Simple Storage Service.
- Google Cloud Storage: Google Cloud Storage Service.
- Azure Blob Storage: Microsoft Azure’s object storage solution.
- Review example data structure: On the right side of the screen, you will see examples of the data you will be exporting:
- Example of event schema: This shows the structure of a single raw event object, detailing the fields and their data types (e.g.,
app_token,event_type,user_id,inserted_at,metadata). For a complete breakdown, see our Event Schema Reference. - Example of tree structure: This illustrates the directory (folder) structure that Userpilot will create in your cloud storage bucket to organize the exported data files (e.g.,
userpilot_datasync_{SYNC_ID}_{APP_TOKEN}/{Date}/all_events.avro). For more details, refer to Understanding Your Data.
- Example of event schema: This shows the structure of a single raw event object, detailing the fields and their data types (e.g.,
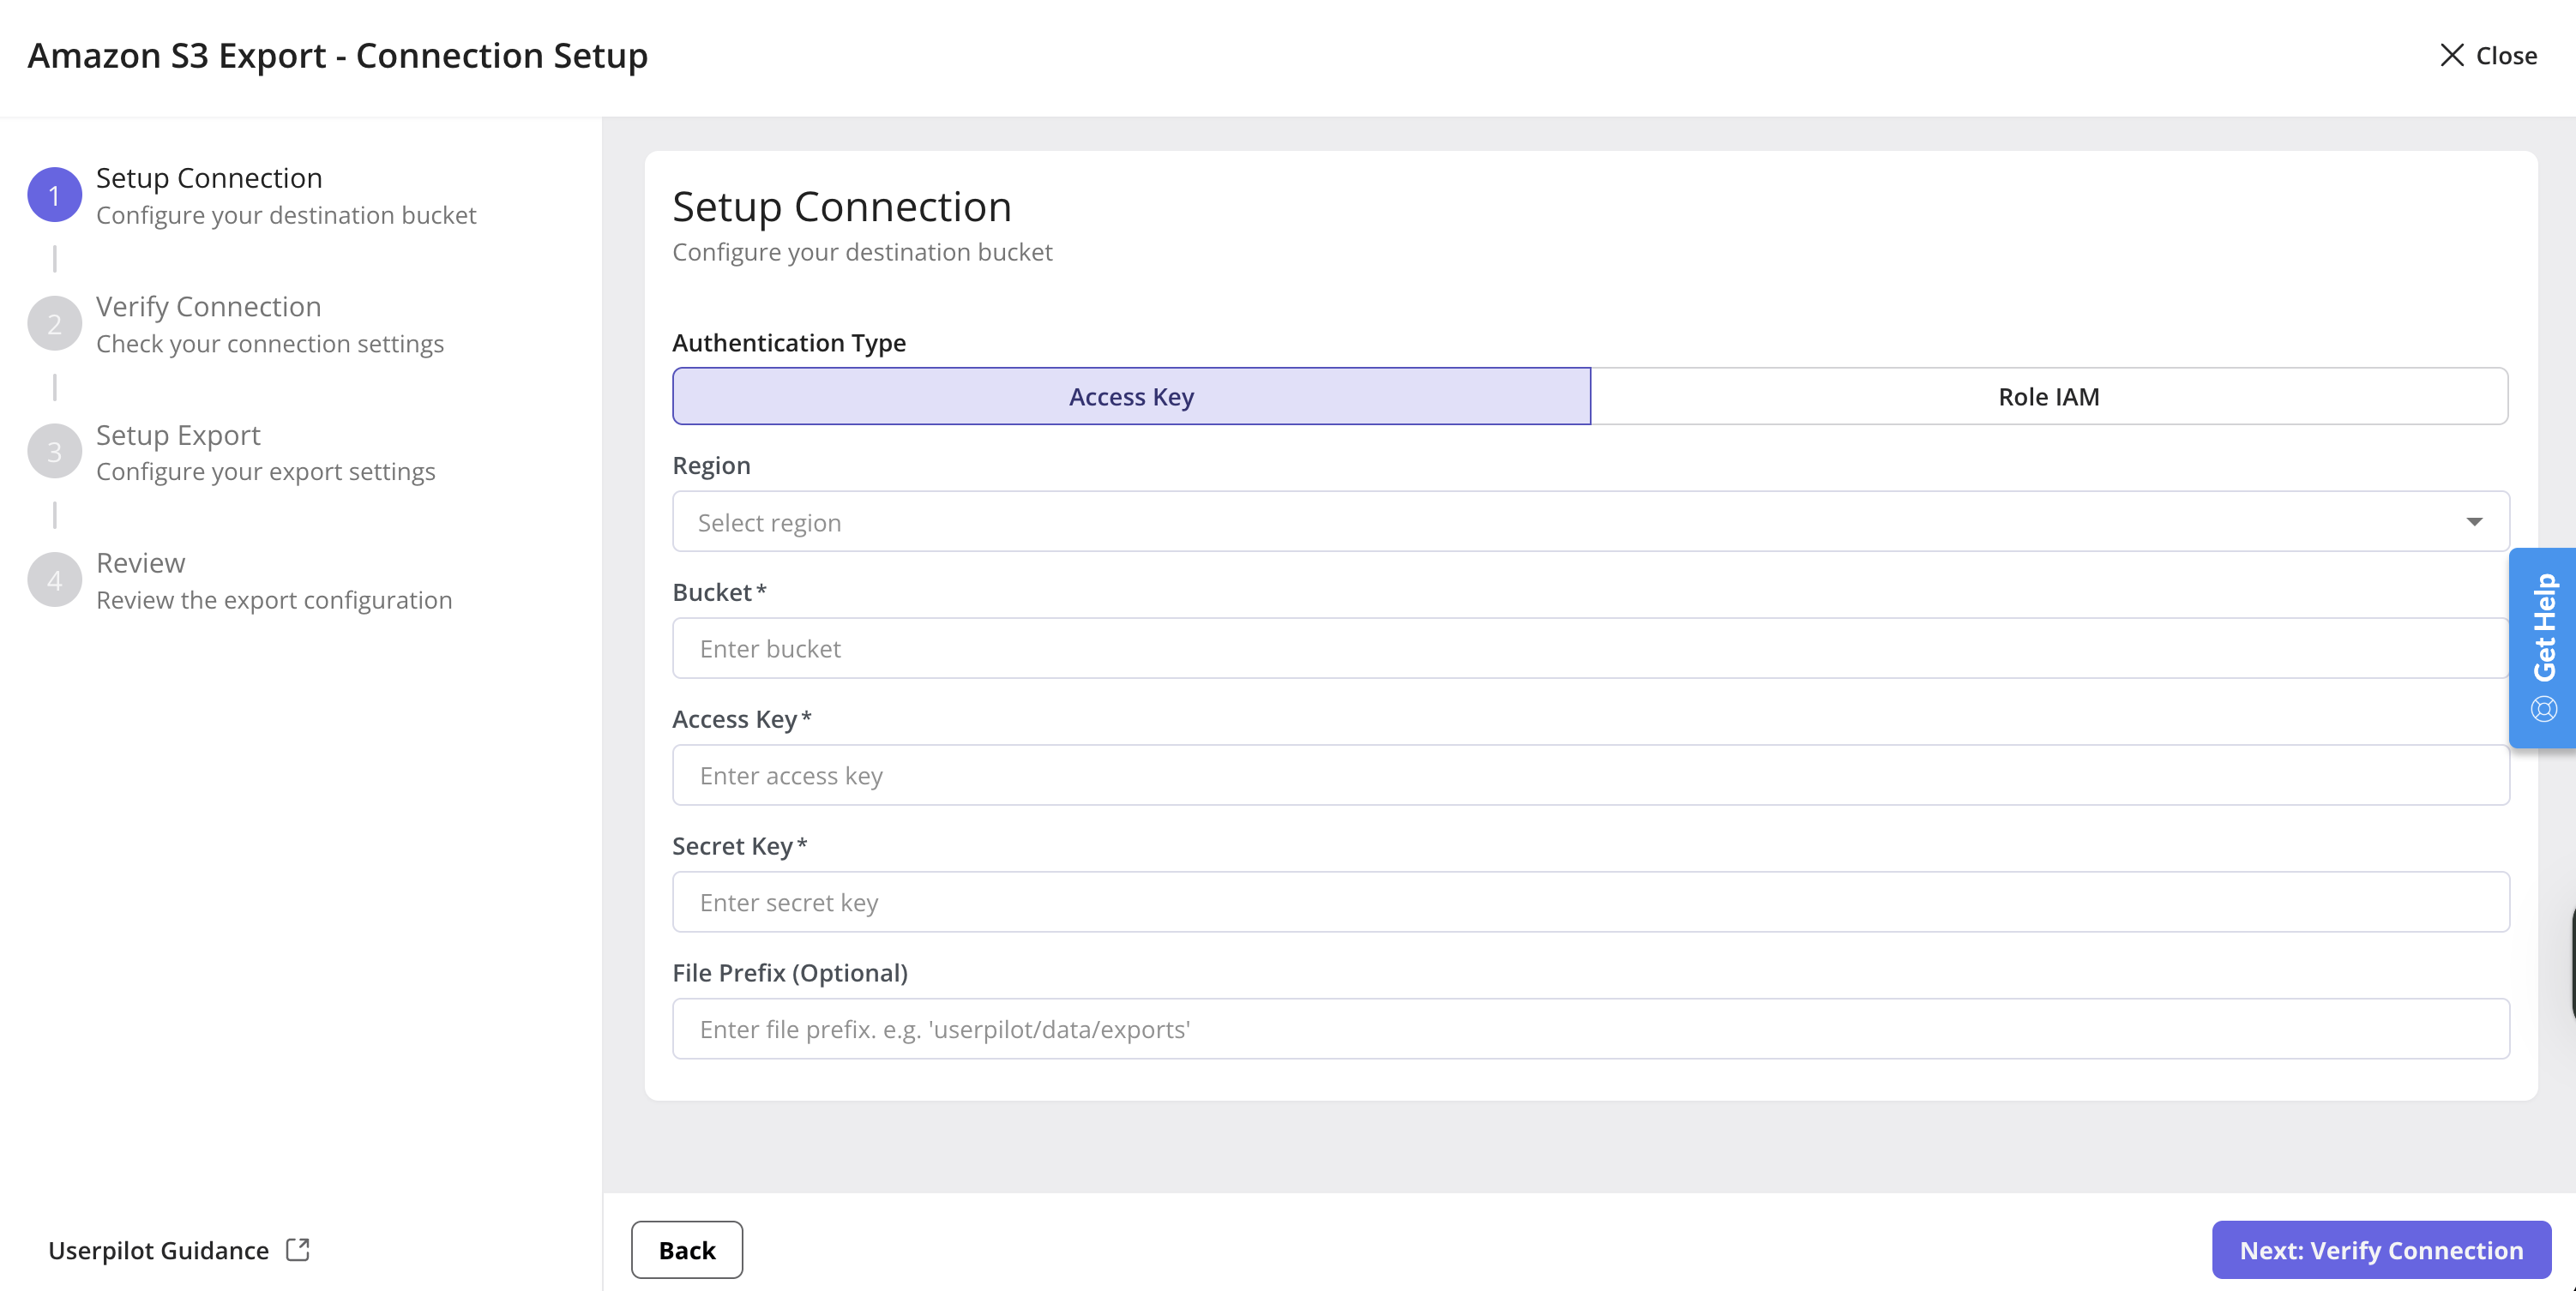
Step 2: Setup Connection
In this step, you’ll provide the credentials or role-based access required for Userpilot to write data to your chosen cloud storage provider. The exact fields shown depend on both the provider and the authentication method you select.Choose Authentication Method
After selecting a provider, an additional drop-down appears for Authentication Method. The table below summarises the options currently supported:| Provider | Authentication methods |
|---|---|
| Amazon S3 | 1. Access Key & Secret Key 2. Cross-account IAM Role (Assume Role) |
| Google Cloud Storage | Access Key & Secret Key |
| Azure Blob Storage | Connection String |
Amazon S3
Method A: Access Key & Secret Key
Fields shown:- Region
- Bucket
- Access Key ID
- Secret Access Key
- File Prefix (optional)
Method B: Cross-account IAM Role (Assume Role)
Fields shown:- Region
- Bucket
- Role ARN – IAM role in your AWS account that Userpilot should assume.
- File Prefix (optional)

Need help creating the cross-account IAM role? See the full step-by-step guide in Prerequisites → AWS: Creating a Cross-Account IAM Role.
Google Cloud Storage
Fields shown:- Region
- Bucket
- Secret Access Key
- File Prefix (optional)
Azure Blob Storage
Authentication method: Connection String Fields shown:- Storage Account Location / Region
- Container (the Azure equivalent of a bucket)
- Connection String – copied from the Azure Portal.
- File Prefix (optional)
Step 3: Verify Connection
Once you provide your connection details, Userpilot will attempt to verify the connection to your cloud storage bucket. This is done by trying to upload a small test file to the bucket and then deleting it if successful.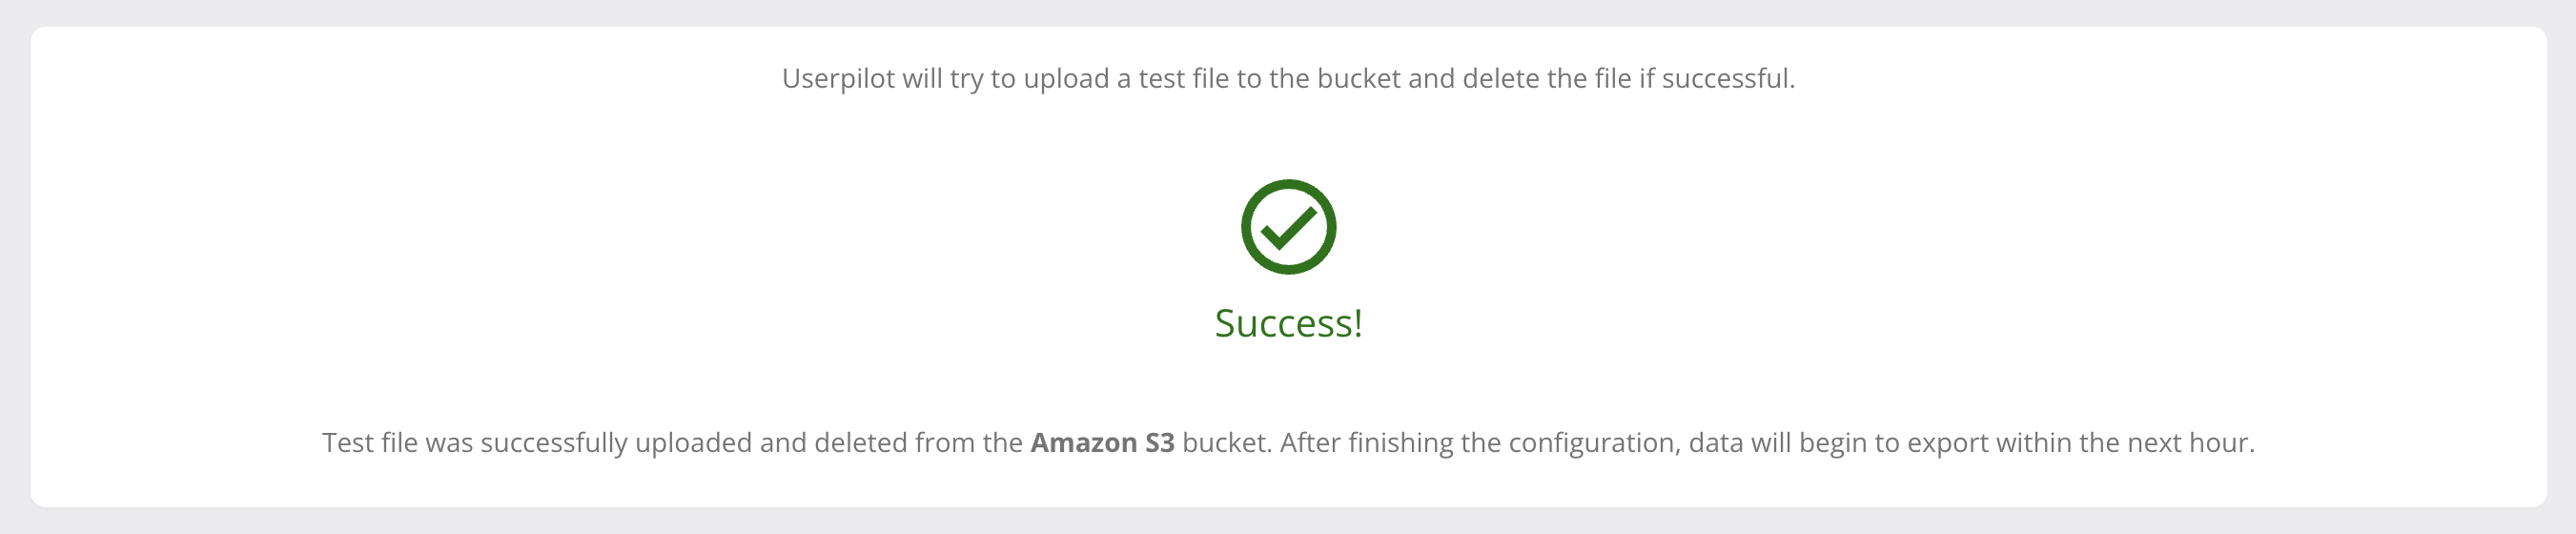
Success! Test file was successfully uploaded and deleted from the Google Cloud Storage bucket. After finishing the configuration, data will begin to export within the next hour.If the connection fails, an error message will be displayed, providing information about the cause of the failure. You will need to review your connection settings and credentials and try again.
🔍 Troubleshooting Tip: Connection Failed?If connection verification fails, double-check:
- Bucket/Container Name: Exact match, case-sensitive.
- Region: Correct region selected for your bucket.
- Credentials: Access Key, Secret Key, or Service Account JSON are accurate and have not expired.
- Permissions: The provided credentials have write access to the bucket/container and the specified path prefix (if any).
- Firewall/Network: Ensure Userpilot IPs can reach your storage provider.
Step 4: Setup Data Export Configuration
After successfully verifying your connection, the next step is to configure the specifics of your data export.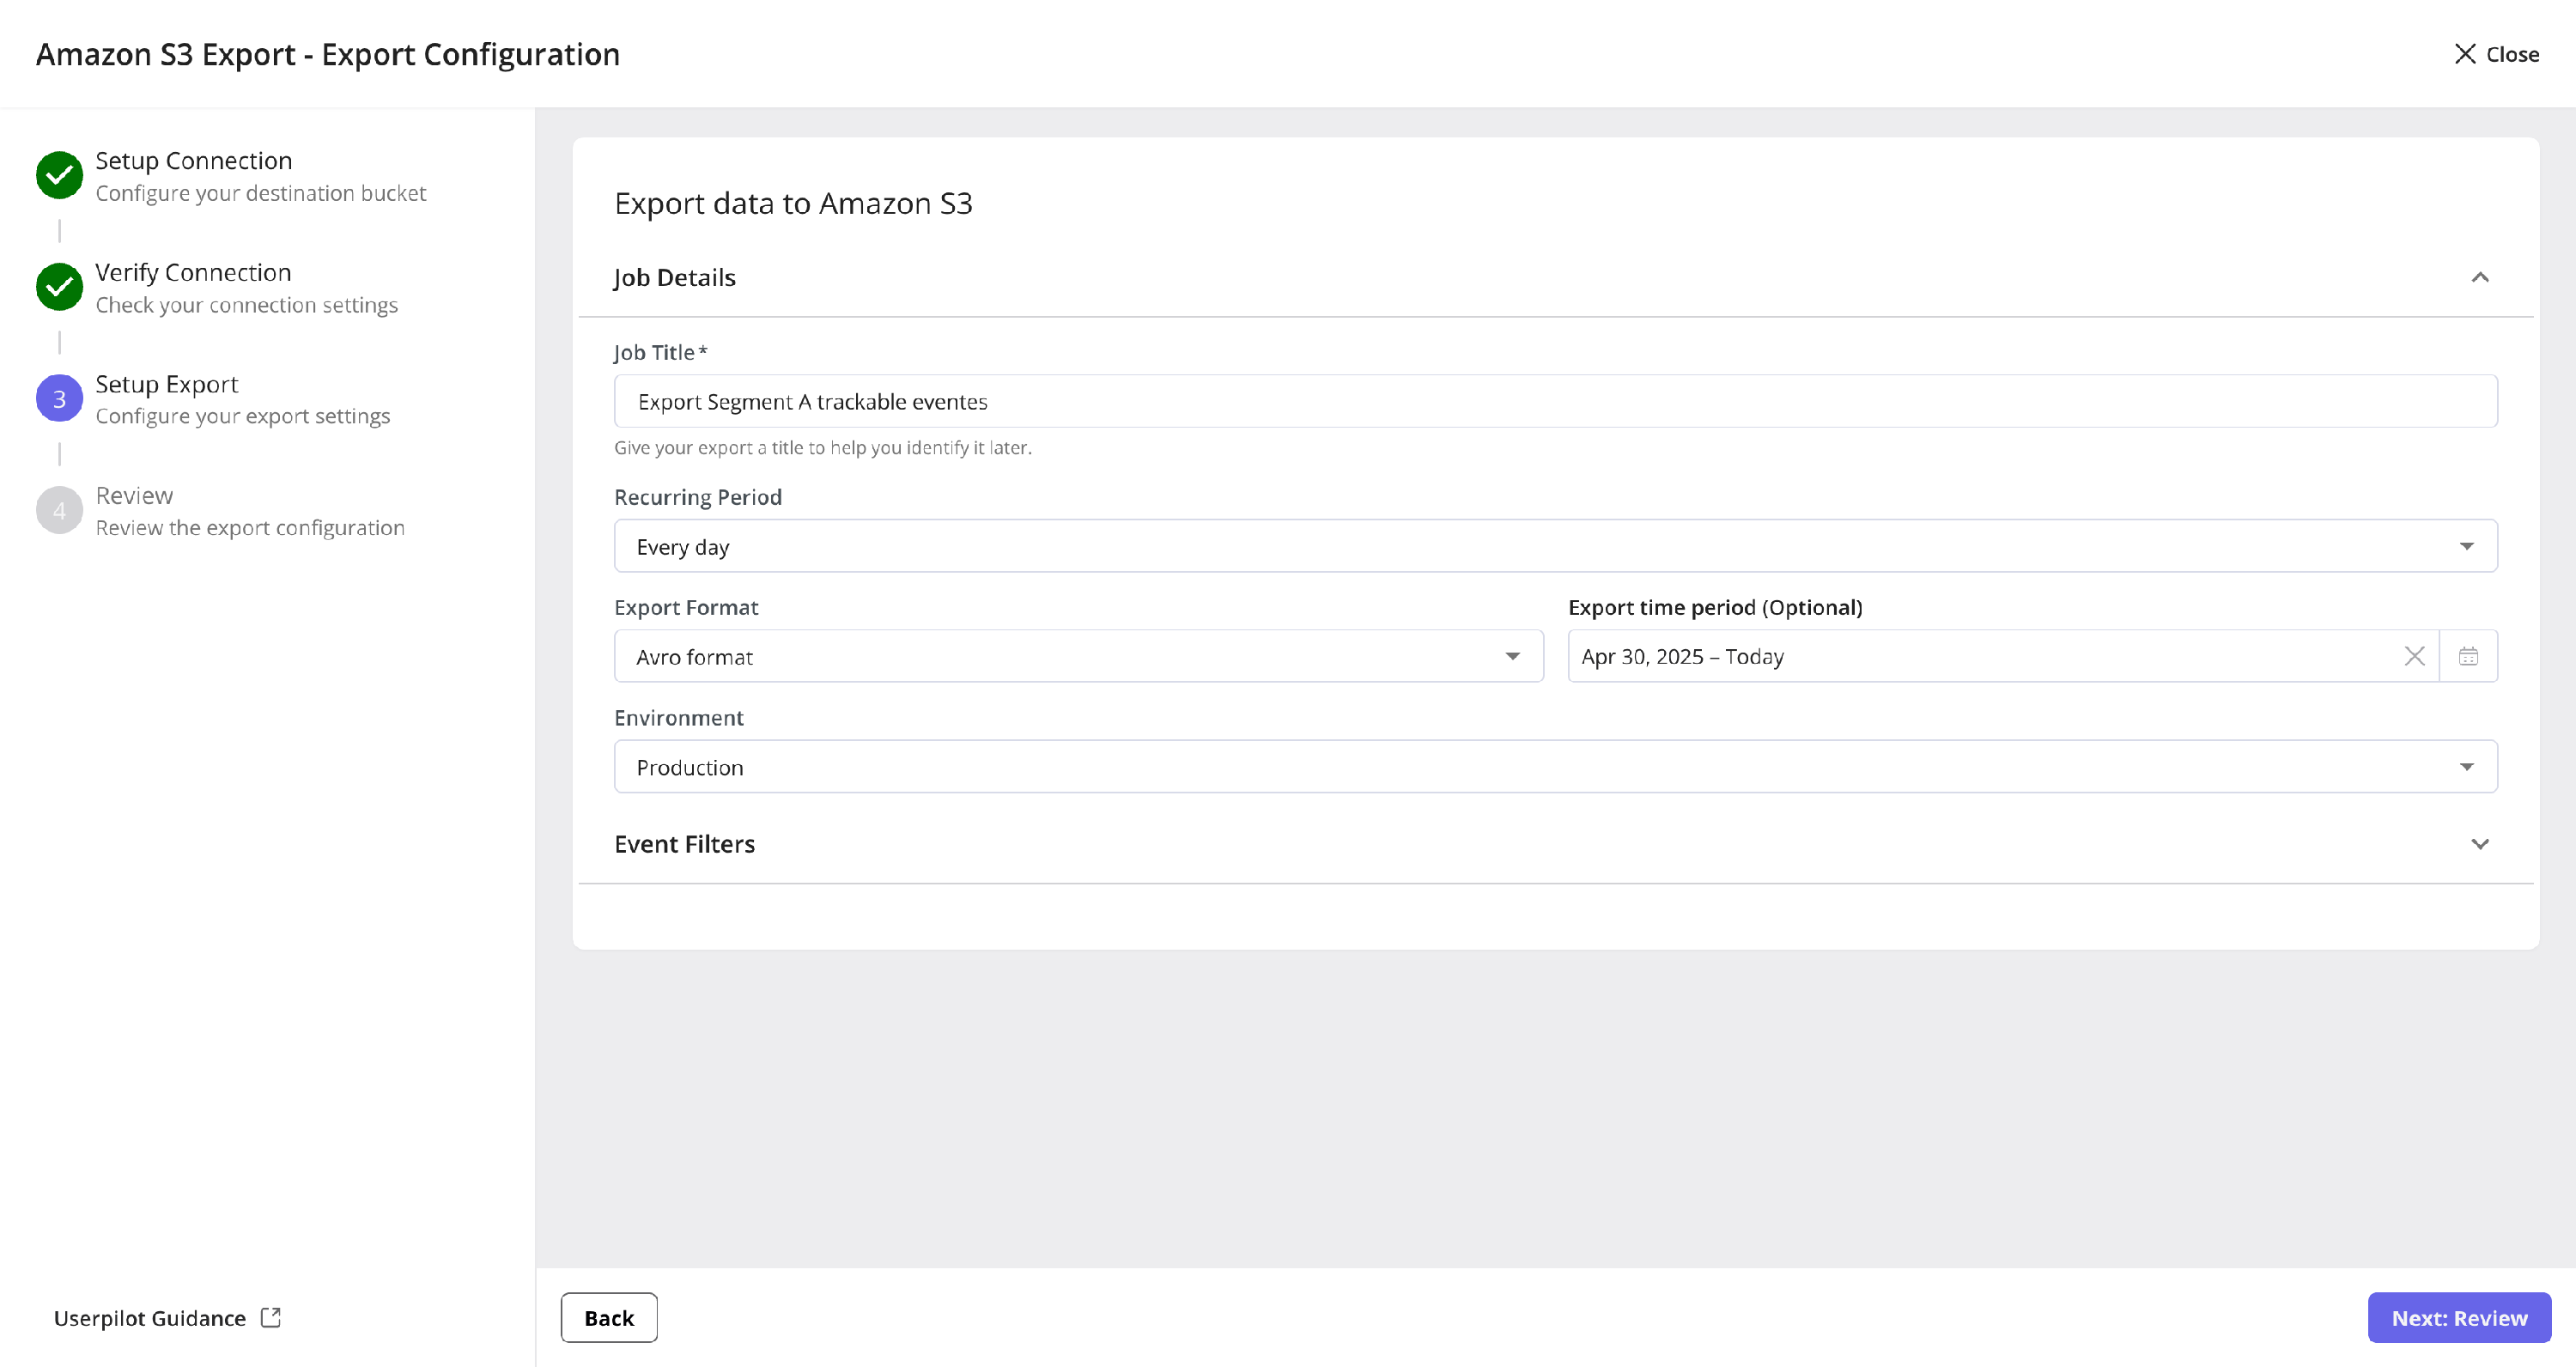
- Job Title: Give your export job a descriptive name that will help you identify it later (e.g., “Daily Production Event Export to GCS”, “Identified users”).
- Recurring Period: Define how often you want the data to be exported. Common options include “Every day”, but other frequencies might be available. Select the desired period from the dropdown.
- Export Format: Choose the file format for your exported data. “Avro format” is shown as an example. Other formats like JSON or CSV might be available depending on the implementation.
- Environment: Select the Userpilot environment from which to export data (e.g., “Production”, “Staging”).
- Export time period (Optional): You can specify a date range for the data to be exported. For example, you might want to export historical data from “Apr 1, 2023 - Today”. If left unspecified, it will default to ongoing exports and to fill back the data up to 365 days from today.
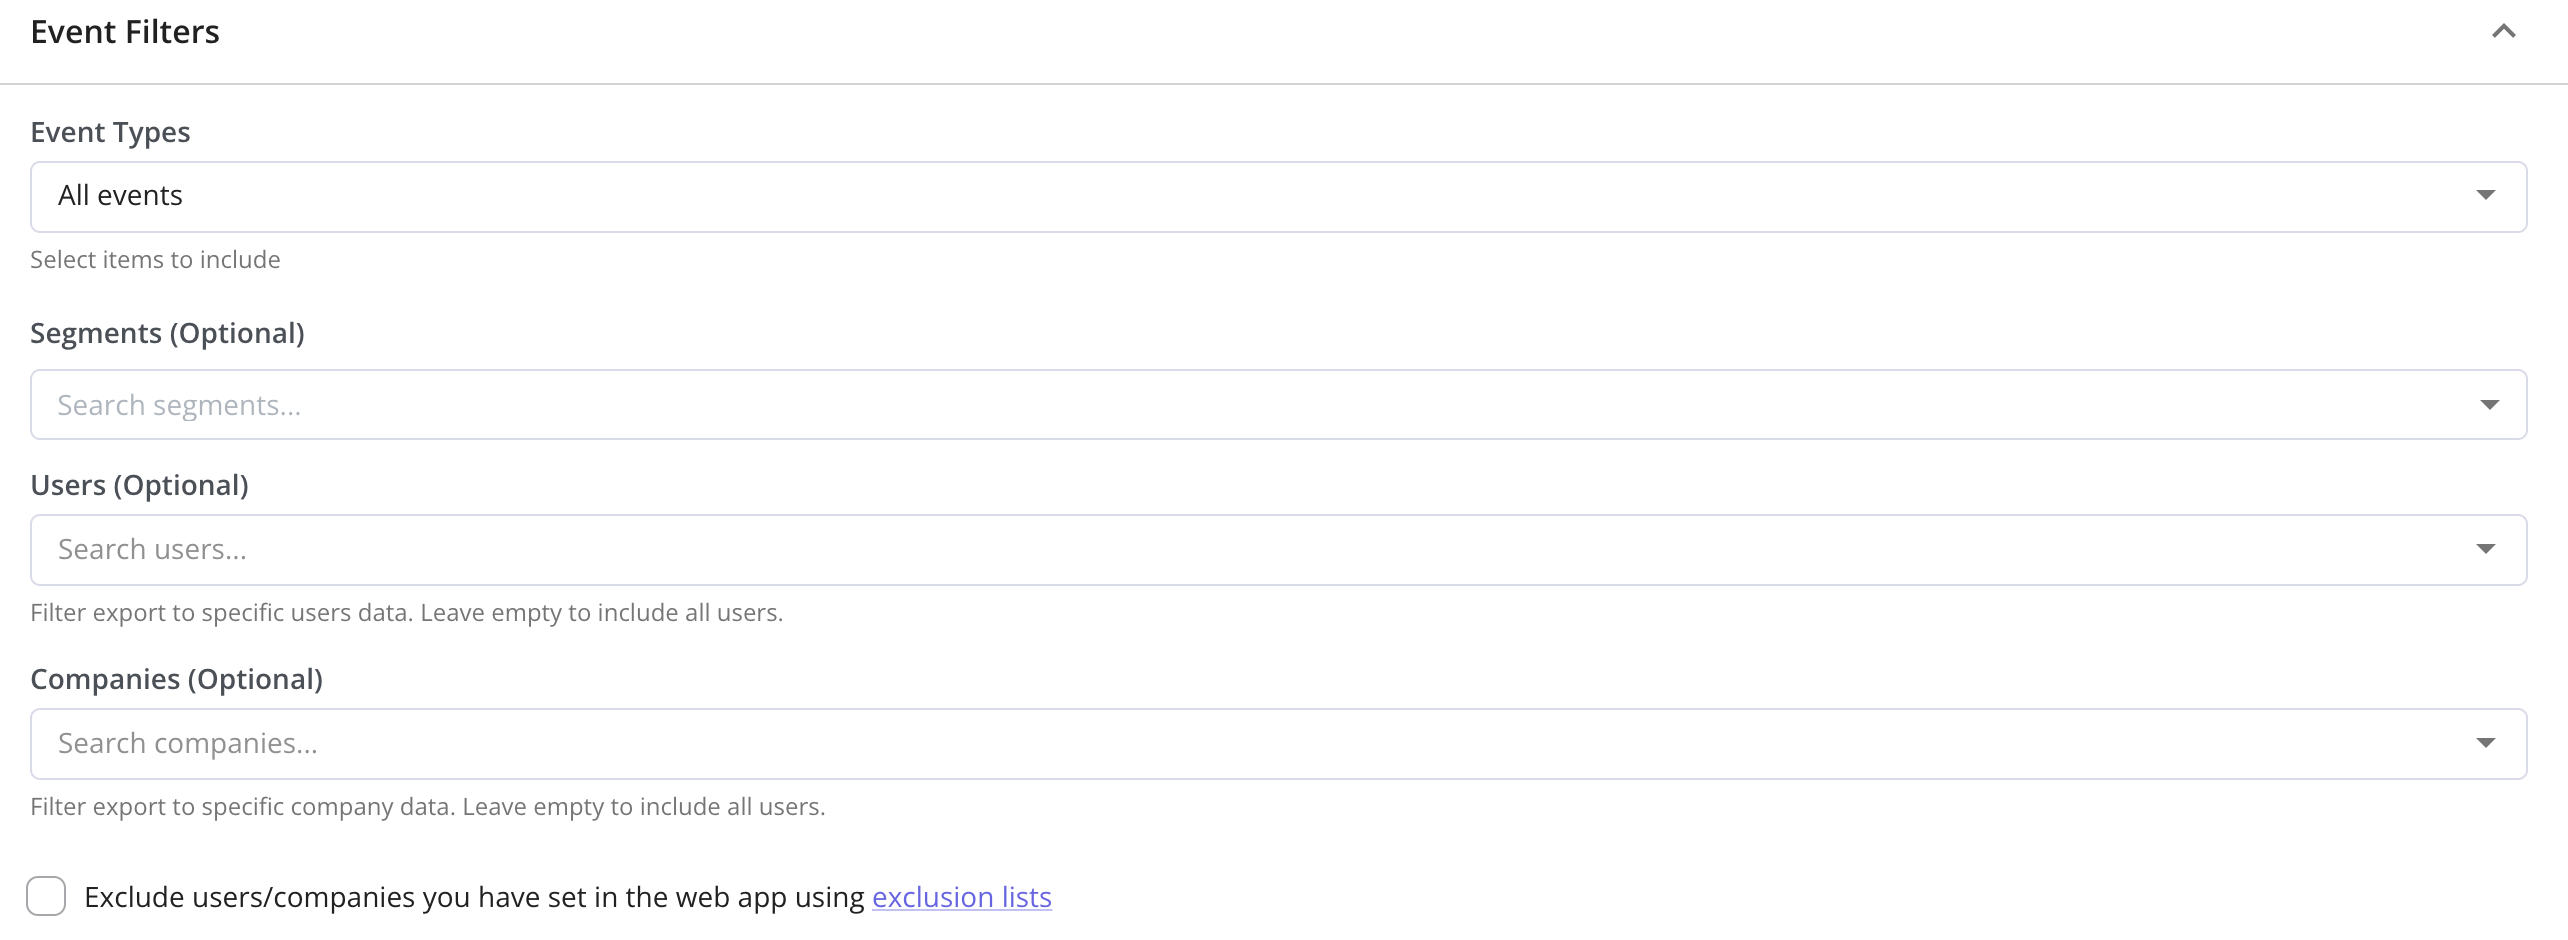
- Event Types: Choose which types of events to include. You can select “All events” or specify particular event types (e.g., identify users/companies, interactions events, page views, tracked events, …etc). Select event types from the dropdown or search to include them.
- Segments (Optional): If you have defined user segments in Userpilot, you can choose to export data only for users belonging to specific segments. Search for and select the desired segments.
- Users (Optional): Filter the export to include data only for specific users. Search for users to add them to the filter. Leave empty to include all users (unless other filters apply).
- Companies (Optional): Filter the export to include data only for specific companies. Search for companies to add them to the filter. Leave empty to include all companies (unless other filters apply).
- Exclude users/companies you have set in the web app using exclusion lists (Checkbox): If you have global exclusion lists set up in Userpilot, checking this box will ensure that data from those excluded users/companies is not included in this export job.
Review Export Configuration
This is the final step before creating your export job. It provides a summary of all the settings you have configured, allowing you to review everything one last time.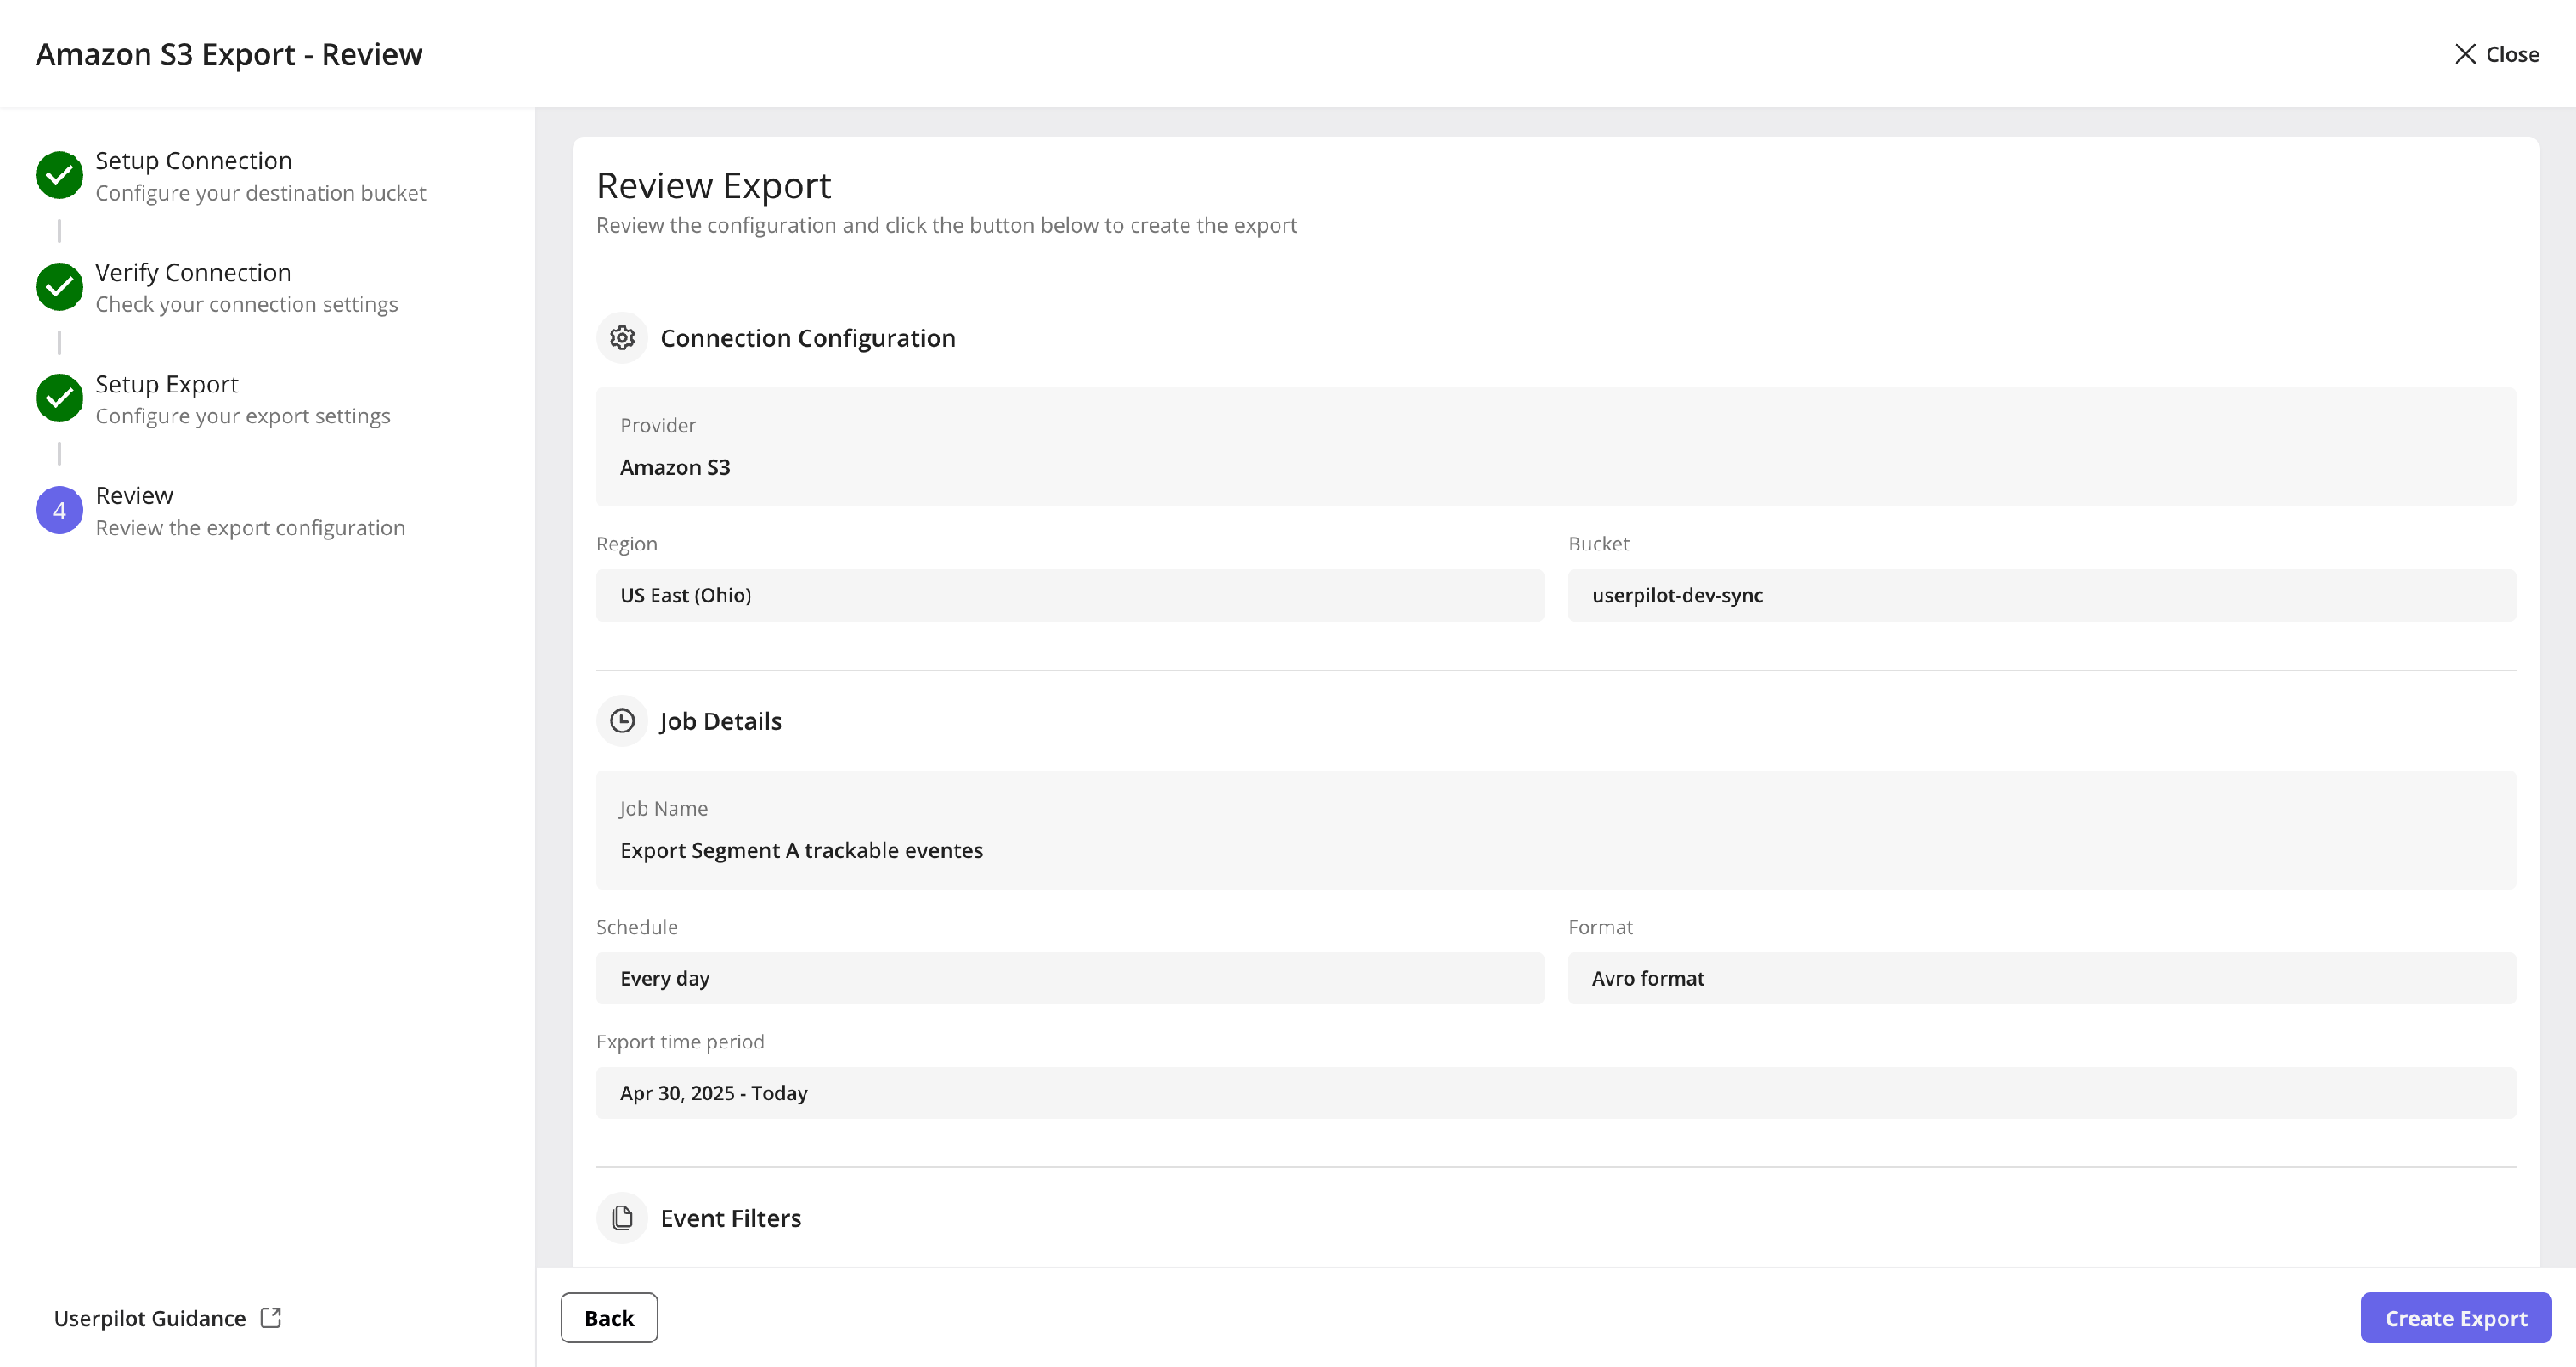
Managing Export Jobs
Once your export jobs are created, you can manage them from the Data Sync dashboard and individual job detail pages.Viewing Job Status on Dashboard
After creating an export job, it will appear on the Data Sync dashboard. You can quickly see its status (e.g., “Live”, “Disabled”, “Ended”) along with other key details.
Viewing Individual Export Job Details & Run History
To see more details about a specific export job and its run history, click on its name from the Data Sync dashboard. This page will show you a list of individual export runs for that job, including:- Sync date: The date or date range for which the data was synced.
- Status: The status of that specific sync run (e.g., “Completed”, “Failed”).
- Completed At: The date and time when the sync run finished.
- Records exported: The number of records (events) exported during that run.
- Errors: If a sync run failed, this column will indicate an error. Hovering over an error icon may provide more details.
- No Exports Yet: If a job is newly created and hasn’t run yet, you might see a message like: “No exports available. You should wait for the next run to be available.”
- Successful Runs: For jobs that have run successfully, you will see a list of completed syncs with the number of records exported.

- Failed Runs: If a sync fails, the status will show “Failed”, and there might be an error indicator. Hovering over the error icon (often a warning triangle) can display a tooltip with the error message, such as “Connection failed to the storage provider”. If you encounter persistent issues, please consult our Troubleshooting Guide.

Managing Export Settings (via “Manage” button)
From the individual export job details page (where you view the run history), or sometimes directly from the main Data Sync dashboard, you can access the settings for an existing export job. This is typically done by clicking a “Manage” button or an equivalent. This will usually open a side panel titled “Manage Export Settings” where you can modify various aspects of your job. Settings you can typically manage:- Export Name: You can update the name of your export job.
- Status (Enable/Disable Export):
- A toggle switch (“Data is automatically exported”) allows you to enable (Live) or disable the export job. Disabling a job will pause future exports without deleting the configuration.
- Connection Details (Read only)
- Job Settings:
- Recurring Period: Change how often the export runs (e.g., from Daily to Hourly).
- Export Format: Modify the file format of the exported data (e.g., from Avro to JSON format).
- Export time period (Optional): Adjust the date range for the data export.
- Filters:
- You can modify the event filters applied to the export job, similar to how they were set during creation:
- Event Types: Add or remove specific event types.
- Segments (Optional): Update segment-based filtering.
- Users (Optional): Modify user-specific filters.
- Companies (Optional): Adjust company-specific filters.
- Exclude users/companies you have set in the web app using exclusion lists: Toggle this checkbox.
- You can modify the event filters applied to the export job, similar to how they were set during creation:
Deleting an Export Job
The option to delete an export job might be found as a separate action on the Data Sync dashboard. Deleting a job will stop all future exports and remove its configuration from Userpilot. This action is usually permanent and cannot be undone.